Turning Runs into Data Visualisation Posters
Sun, 05 Jan 2020
I have been pondering the idea of publicising my run data in an effort to get me to run more. If its public, I can easily be held accountable. I’ve been using the Nike Run Club since 2014 and have logged just over 200 runs over that time using the app. That’s a lot of data.
Sadly, even in a world where GDPR is a thing, Nike has not made it possible for people to download their own run data. I think this is in an effort to keep you using their app as having access to your run data would make it too easy to switch to another service.
The (Automated?) Journey for an Access Token
Thanks to @yasoobkhalid I came across this gist that explains how to hit the Nike API assuming you have a bearer token from the Nike site - they use the same auth service for both their site and the Nike Run Club app. The only problem with this process is that it requires you to go and login to Nike to get a new bearer token whenever you want to retrieve your data - Not cool. I want to be able to retrieve my data as part of my Gatsby build script every time I deploy my site and I don’t want to do this manually.
Time to whip out Node and see if I can hit the Nike Auth service with my login credentials. A simple POST request to their auth service. Or not. To cut a long story short, this failed. When trying to send this post request through node I got:
1 2 3<H1>Access Denied</H1> You don't have permission to access "http://unite.nike.com/login?" on this server.<P> Reference #18.1e6cd417.1571674983.fd73639
Nike’s website seemed to be stopping me at every turn - not surprising really. I was probably missing a cookie that was needed for the request. Then I had a bright idea💡. Instead of trying to hit the auth API through a POST request, I thought I would instead see if I could intercept the login post request response using puppeteer as it would technically visit the site for me. Slower but I might have better luck! The code I came up with can be seen below.
1
2
3
4
5
6
7
8
9
10
11
12
13
14
15
16
17
18
19
20
21
22
23
24
25
26
27
28
29
30
31
32
33
34
35
36
37
38
39
40
41
42
43
44
45
46
const puppeteer = require("puppeteer")
const shell = require("shelljs")
const dotenv = require("dotenv")
dotenv.config()

const callScript = token => {
  shell.exec(`npm run nike_activity ${token}`)
}

puppeteer
  .launch({ devtools: false, headless: true, args: ["--incognito"] })
  .then(async function(browser) {
    const page = await browser.newPage()
    page.on("response", async response => {
      const url = response.url()
      try {
        const req = response.request()
        const orig = req.url()
        if (orig.includes("login")) {
          const text = await response.text()
          const body = await JSON.parse(text)
          const status = response.status()
          console.log("🎉 Found login response!")
          console.log({ orig, status, body })
          await browser.close()
          callScript(body.access_token)
        }
      } catch (err) {
        //console.error(`Failed getting data from: ${url}`)
      }
    })
    await page.goto("https://www.nike.com/gb/member/profile", {
      waitUntil: "networkidle0",
    })
    console.log("👟 Navigated to Nike.com")
    await page.click(".g72-menu")
    console.log("🍔 Clicked on burger menu")
    await page.click("#MobileAccountMenuHeader")
    console.log("💪 Clicked Login")
    await page.waitForSelector('input[name="emailAddress"]')
    await page.type('input[name="emailAddress"]', process.env.nike_username)
    await page.type('input[name="password"]', process.env.nike_password)
    console.log("✍️ Filled In Form")
    await page.click(".loginSubmit")
    console.log("✅ Submitted Form")
  })
The script takes 15 seconds to run, based on my internet speed - I can live with that, especially as I am only running this script when I build with an optional flag.
After further testing I managed to make it even faster by removing:
1waitUntil: "networkidle0"
I had done this to ensure the nav had loaded but it turns out that it was also waiting for all the resources to completely load the page. Instead I could just wait for the element I wanted to click:
1await page.waitForSelector(".g72-menu")
This got the script run time down to X seconds on.a pretty average network speed. Nice.
Getting Activity Data
You’ll see I have a function called CallScript() in the puppeteer code above. This executes the getActivity.sh bash script that is taken from the gist. It fetches activity using the bearer token retrieved from puppeteer.
1 2 3 4 5 6 7 8 9 10 11 12 13 14 15 16 17 18 19 20 21 22 23 24 25 26 27 28readonly bearer_token="$1" nike_plus_api() { curl -s -H "Authorization: Bearer ${bearer_token}" "$@" } activity_ids=() activities_page=0 while true; do activities_file="data/nike/activity-files/activities-${activities_page}.json" if [[ -z "$after_id" ]]; then url="https://api.nike.com/sport/v3/me/activities/after_time/0" else url="https://api.nike.com/sport/v3/me/activities/after_id/${after_id}" fi echo "Fetch $url..." nike_plus_api "$url" > "$activities_file" activity_ids=("${activity_ids[@]}" $(jq -r ".activities[].id" "$activities_file")) after_id=$(jq -r ".paging.after_id" "$activities_file") if [[ "$after_id" == "null" ]]; then break else activities_page=$((activities_page + 1)); fi done
This works perfectly but I decided that having it switch between node and a bash script was not very efficient and would make it impossible to run on a CI/CD pipeline. Lets rebuild the bash script as JavaScript code!
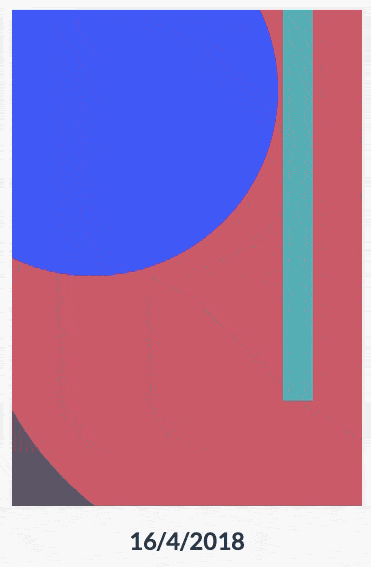
Getting Arty
While browsing the wonderful world of twitter, I came across a tweet from @zehf. He created arty data-visualisation posters from World Cup statistics for each match:
https://twitter.com/zehf/status/1010682969453973504
I thought the idea was really clever and this gave me a thought - if World Cup matches are worthy of art then surely my run data is?
I decided to pull out the p5.js library as I have used it in the past and its perfect for making small graphics in JS. I wanted the posters to be built purely from the data and not generated randomly. To do this I turned elements of the data into hex colour values using this function (almost certainly stolen from stack overflow):
1
2
3
4
5
6
7
8
function hashCode(str) {
  var hash = 0
  for (var i = 0; i < str.length; i++) {
    hash = str.charCodeAt(i) + ((hash << 5) - hash)
  }
  return hash
}
I then used the metrics of my run to draw shapes in the same positions on every poster. For example:
1
2
3
4
5
6
if (calories) {
        c = p.color(allSummaries.colours.calories)
        p.noStroke()
        p.fill(c)
        p.ellipse(x, y, calories * 0.6, calories * 0.6)
      }
What we end up with are a whole lot of unique looking run posters!
...
...
...
...

